Visit My Website, A Personal Gallery!


Click on Logo Bar Below, to visit my website!


Monday, May 31, 2010

WIP-NSW

I just started a special request, for a loomed cuff. This is for someone very special, who lives in Australia! She is a huge Rugby Fan and sent me tons of links for ideas. Not only was I amazed at the creative information she was able to send me, but I learned so much about that sport! This Team is the NSW (North South Wales) Cockroaches and their team color is Aqua Blue.

When I design a new bead loomed piece, I'll pick out a photo, taking into consideration how many beads wide can this pattern be seen and recognized. Too much detail, the cuff becomes too wide, too little detail and there are only spots of color. This picture was an interest to me and I feel I can recreate the Mascot in just the right amount of detail and width of beads.
I don't use bead programs, only because I always worked in this manner, but I plan on learning more about them, in time. Right now, I am using my comfort level of creating a pattern. After the picture is selected, I superimpose a loom graph on top, make a few changes in the details of the pattern, then I select the bead colors, from the colors I see in the photo.

I will not include the gold letters you see at the top, and will move the NSW more to the left, or center this for my cuff. There is a good portion loomed, at this point. Notice the arm of the Mascot, on the left, how it seems to be cut off. I plan on recreating an arm by hand weaving one then applique this on top of the cuff.

So far I have grabbed 73 different 11/0 Delica Bead colors for this piece. I will be using a 'sterling slide bar clasp' and create an edging to balance off the applique arm.

Monday, May 24, 2010

How Many Colors until the 'End of the Delica Rainbow'?

Today I received another order of Miyuki Delica Bead Colors, 11/0. While unwrapping and putting them in to their stackable, twist off containers, the subject of 'how many Delica Colors' are actually produced, came to mind. I have read in Blogs and Forum posts, authors stating there are, "...thousands of Delica colors." There is only 1,012 (which now includes the 30 new neon color lined and the latest 42 duracoats as of 7/7/14), to be exact, but Miyuki continues to produce ,others at a slow rate. Today's catch brings my ownership up to 642 colors!
While storing my beads, I thought about their numbering system and wanted to share some thoughts.

When I receive packs of beads, no matter who the supplier, they are poured into a 'canister' that is clear, stacks and twists each separate cup together. I prefer this type of container, over a pill vile, tic-tac boxes or tubes, because I can use this very container while beading, since they are wide enough for my needle to pick up beads. Below is an example of how I use these containers.

Each cup untwists, so I can select the bead color I am using for any particular project, they conveniently twist back together for travel, you can see the bead colors very clearly and there is no need to pour the beads back into any container. The label, from the bead supplier's packaging, is peeled off and stuck to the inside of the container. I then use a white label to write the same DB #, and stick this on the outside of the same container. The stacks are in numerical order, on my shelves. This makes it easy to find a particular color number or I can see shades for matching colors. The label stays inside, incase I need to reorder. [NOTE: Purchase the same 'brand' of containers, for all your beads. Many companies use different threading systems. Mixing these systems won't allow the canisters to be secure.]

It is true that Delicas or any round tubular brand of beads, are perfect for looming. But the main reason I love to use Delicas, is the array of color choices they offer. Miyuki Delicas 11/0 are offered in 942 colors. You may notice the number range being as high as 1818, but Miyuki is reserving many number slots for future use. For instance, their #400's, mainly galvanized metallics, only range in numbers of 410 thru 465. It is the same for many number groupings. Going through the entire list of numbered colors offered, there are only 942, 11/0. This is an awesome color pallet to choose, when looming a picture! Compared to other lines, i.e, Miyuki Delica 15/0, there are 105 colors. Toho Treasures 11/0, 258. Miyuki Round Rocailles 11/0, 404. Miyuki Round Rocailles 15/0, 361. Since I do not use a Bead Pattern Program, I enjoy having this huge pallet available, for selecting the colors I see in photos.

Aikos are so much more uniform in size, and offer many color choices too. The difference is there are about 1000 colors of 11/0 Aikos, only to find that many of them are now 'discontinued colors', even though their numbering system extends to 2459. I haven't noticed Miyukis Delica colors being 'discontinued' other then two or three, in the past five years.One was discontinued due to the cost of silver and gold. I admit Aikos are much more uniform in shape and size then Delicas, with no need to cull, but again, I go for the color choices.

Every Artist strives to make their pallet the widest range of colors they can, I do the same with my 'bead pallet'!

Friday, May 21, 2010

A Mirrix is Looming

I have been interested in many looms, and own so many different types and sizes. I will include my take on each type of loom, in my book. Of course, as with any tools or supplies, we all have our preferences. Remember, 'keeping the tension' is the best way to describe what makes a loom 'good'.

Yesterday, I purchased my first Mirrix Loom. I decided on the 16 inch wide version, reading everything I could, about this loom, before I made my choice. What I found is that these looms arrive with nothing more then the frame, stand, one spring on top, a warp bar and a shuttle. I feel these looms were originally created for 'textile looming'. Since they have the warps, of course it can also accommodate beads! Again, not knowing much about textile looming, I can only guess at this conclusion.

From the description, it seems to be welded and fabricated sturdily out of metal. The frame is adjustable, if you purchase additional accessories. Speaking of accessories, this is what really shot the total cost up....the accessories. The base price of the loom is so much more then other wonderfully crafted looms on the market. Once you include the accessories, desired to make this a great bead loom, your cost can be overwhelming for a loom this size.

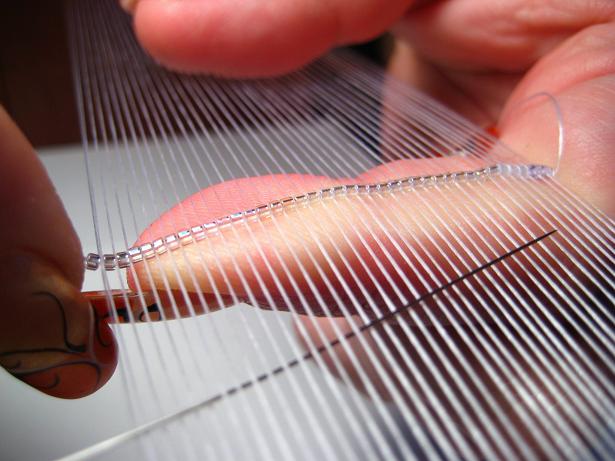
The one warp bar, that arrives with the loom, is movable and is the point where your first warp thread is tied. This same thread is to be wrapped up around the top bar, in between a groove of a spring, brought down the front, wrapped around the bottom bar, (no spring attached) and double looped around the original warp bar (where the knot was first tied). The thread is continued in this same three step pattern, until the entire loom is warped the proper number of warps you'll be using to loom.

What you find, after warping the way we are instructed, is a 'double wrap' of warp thread, appx. 1 1/2 inch apart. To begin looming, you will need to 'slip your hand' in between these warps to handle your beading. Not only could this be uncomfortable, until you can devise a way to make it comfortable, but you are threading this loom with double, maybe triple the amount of warp strings you will ever need! Such a large waste of thread. One of the accessories, offered for an additional purchase price, is another 'warp bar'. This is allowed to be clamped on the lower portion of the loom, with the original warp bar clamped on the upper portion of the loom. Then, you can warp your loom using these two warp bars, not having to make a complete pass around the back. The warp bars are also able to be moved, sometime during the beading process, so you can 'slip your work around' offering more room to continue bead looming. Therefore, the height of one of their looms, really wouldn't be an issue to consider, if purchasing one.

All of the looms include a top 'spring' for separating the warps. If you prefer to use a loom with a spring bar across the bottom of the loom, then this too is an additional purchase. Otherwise, you just wrap your warps around a bar. After looming some rows of beads, using just the one spring, the beads will keep the rows of warps separate. Because I prefer the spring, top and bottom of my warps, I also purchased an additional spring.

I mentioned above how close the front warps and back warps are wrapped, around this loom, with a small space in between. An additional bar and clamps are being sold, as an accessory, so you can clamp this in place which will 'widen' that space between the warps, when warped. But it only states that this additional bar increases the space another inch or so.

One other accessory that may have interested me, but I did not purchase at this time, is the 'extender' bar set. This would increase the 'height' of the loom. I may purchase this later, but will wait and see how it works without this extender, first.

My decision to purchase this loom was one I thought about for sometime, as the cost is quite high. A driving force was the fact that I receive many emails, with questions about looming. Over 1/3 of my emails are from Bead Loomers who were either 'gifted' a Mirrix Loom or 'purchased' one themselves. To be more helpful with my answers about looming, I thought I should have first-hand-knowledge, of this loom. It is disheartening I had to purchase so many additional accessories, to construct a loom I know will be productive, for my needs. But in the same light, I feel satisfied the fabrication will be sturdy and well made.

Following my purchase being completed, I received an email saying this order will take approximately two weeks to fill, as the loom is being constructed as ordered. I should be receiving the accessories I ordered prior, but the loom itself will take longer to arrive.

I will include further notes about my 'Mirrix Experience', after I receive it and start/finish a looming project. One cool thought I have about this loom, is how the 'warp bar' becomes adjustable! If it works out like I think it may, then there are some unbelievable techniques I can share, to offer even more of an interest in Bead Looming! If not, then my stand by 'Larry The Loom', could handle these thoughts, as the top and bottom panels are also adjustable!

Monday, May 17, 2010

Increase Your Canvas Size

When I start a new Looming, or commissioned to create a new cuff, it always comes to mind how much nicer this would be if there were matching accessories! This cuff is now complete, titled "Forget Me Not". It was a perfect design to include a matching pair of earrings and a flower ring.

This was the perfect subject matter to include a ring, because it almost looks as though one of the small blue 'Forget Me Not' Flowers, fell of the cuff and onto the finger!

I also want to point out that each of the petals, on all of the small 3D Flowers, are not matching in color scheme. I created each petal in a random color sequence. This too lends itself to a 'realistic' feel.

Notice the clean lines of beading around the clasp. This was attached with out any beads leaning or crooked, as sometimes occurs when hiding warps...my methods solve such a dilemma!

Once again I am sharing a completed looming and offering a new way to think about your designs. Look at creating more then just one parcel, of any design, and how it can be magnified into something more involved. This will allow more practice. Most of all, I am suggesting this to give you a new way to think about your designs and know that increasing your 'canvas' will help you to think differently, when you start a new Bead Looming.

Saturday, May 15, 2010

Ante-Up Past Posts!

I shared some 'beginnings' of cuffs, in previous posts. I'll come clean with a bit more info, regarding those photos and posts!

Just to add a bit more interest in my 'Finishing the Warps' technique, I will say that I finalized each of these two cuffs, pictured below, within '45 minutes'. We all know that 'Looming' is faster then 'hand weaving' beads...not better, just a faster method of addressing the same number of beads. (As a matter of fact, I'll be mentioning the necessity of knowing the difference between 'looming and hand weaving' and how it will help in your designing, later on.)

Early last week, I included a 'snippet' photo of an edging. Here is the completed cuff.

You will notice that Bead Looming does not have to stay as constrictive as 'B-E-A-D L-O-O-M-E-D'. You can add many other facets, i.e, focals that are bezeled, hand woven sections (sometimes even small earring patterns make great additions to looming a cuff), or hand weave an edging similar to brick/peyote or free from. This cuff was created to stress that very fact.

Personally, I really do not allow any looming to be called 'Complete', without some type of finish on the edge. An additional completed edge not only offers stability, design options, creativity and sizing variables, but also 'strength'!

I make my initial looming, my 'canvas' and work upwards from a 'loomed beading' as easily as working from a newly 'stretched canvas'.

One more snippet...so I guess I am not totally going to 'ante-up' with this post....(sorry!)..but this is a part of something I will need completed by Tuesday.

Again, you can see that more of a '3 Dimension' was included, to the '2 Dimensional' design, I created. (Can't wait to talk more about patterns, creating and buying!)

This is also a follow up to the very last post I added. I'll splash the entire set, once completed!

Thursday, May 13, 2010

Consider the 2D before the 3D!

I have completed the 'base' portion of this cuff. Again, this is the 'Forget Me Not' Flower Cuff I started working on yesterday.

As a follow up to the last post, about the 'Weft Being the Bead Color Boss', you will notice how bright the bead colors shine, beyond the dark background I selected.

Now, I am progressing beyond the 'bead colors' and thinking more of the design and pattern I had in mind. It seems, from the picture on the left, that this cuff will show off an 'A-Symmetrical' design. Actually, I am planning for half the cuff to show in a 'two dimensional form', like many looming designs, but will finish up with a 'three dimension' addition.

When I design a cuff, I am not only creating a 'picture' but a 'feel' or try to relate the 'subject matter' to how it can best be displayed. In this cuff, an addition of small 'Forget Me Not' flowers, in 3-D form, will round out this cuff designed around 'flowers'.

I will offer this pattern, for the flowers, as I begin to create them, petal by petal. For now, I am still painting my picture, using seed beads.


This is the first in a multiple layer of edging, I want to include. Because of adding some dimension, in the form of flowers, I want to totally complete the edge. This way I won't have any problems running my needle through rows of beading, as I would if the flowers were added first, while edging.

Planning the total design, before you begin, is a major part of how I want to train Bead Loomers to think. Starting in one direction, then switching to another will create more work in the end. This even includes knowing what clasp you plan to add, when you start!

Wednesday, May 12, 2010

The Weft Is The 'Bead Color Boss'!

I just started a new loomed cuff. This is going to be a cuff of 'Forget Me Nots', a small blue flower, which will lend itself to a 3-D build idea. When I start a new project, I always take the time to consider many facts. Because I loom so often, it is 'second nature' to me, just to grab the beads I want and the threads to begin. Today, it struck me how important this first thought should be, for any looming. Let me share how I begin.

This won't be the first time I have written the importance of 'planning your looming' before you proceed, 'Stay three steps ahead'. Take a look at the picture below, the first 30 or so rows of the cuff I just started. Look close at the 'warp' and 'weft' threads. Notice the difference in colors I am using. A decision for 'warp' or 'weft' thread color, begins after I select the beads, for any looming project, i.e. Subject of the bead work first, bead color selection second, then warp color and finally weft color. You may see that the 'warps' are strung using 'Green' and the 'weft' is 'Blue'!
I made bead color choices, for this picture, to include many bead finishes. There are Metallic colors, Silver Lined colors, Opaque colors, Ceylon colors and Transparent colors. The Transparent color helps me to decide what color weft to use, but I am also keeping the Ceylons in mind too!

Below is a picture of how the 'weft color' can change the entire color choice, for your looming!

I labeled each one of the bead types, along the top. The warps are Green, because my looming will have more green or dark colors, then any other, in the backgroud. On the right, in the picture above, you'll notice the different color 'wefts', sampling a row of the same bead types. Notice how the choice of 'weft color' can change your bead color. Such selections can determine your looming to be 'bright' or 'drab'.

Using the warp color, best matching your majority color in the looming, is correct, because it is the only portion of 'any thread used to loom' that will be noticed later on. As the looming bends or moves, the warps are seen in between the beads. The warp color needs to be a perfect match to the majority of bead colors selected.

However, using a correct color weft, will allow your bead colors to 'pop'. This thread will not be seen, when you are complete. So try to remember, "The Weft Thread is the Color Boss"!

I'll be sharing more pictures of this looming, as I work, in the up coming days.

Monday, May 10, 2010

Changing Your Warp Thoughts!

It is unfortunate, at this time, that my book is not in print. My Introduction states how I am out to 'completely change your past thoughts of how-to-loom', then make you love the warps, realizing how much you need them! This post is an exact example of my introduction.

Looming requires a bit more 'pre-planning' then most bead weaving projects, in my humble opinion. This would include realizing the finishing aspect of your bead looming, from the beginning. If you plan on a fringe or edging, of any kind, be sure to 'double the strength' of all outside edges. It may also include a 'split loomed necklace', having to count the warps across to acknowledge the opposite edge of one band, skip the center warps, then mark the other band width.

Warp your Loom 'two' warp threads short of what you actually need, using Nymo D as I do. As it goes, you always warp your loom 'one more' then the bead count width. I am now asking you to "warp the loom two warps short of the actual warp threads needed, or one number less then the bead count wide!" This count will now allow you to add the additional two 'outside warps' using a stronger thread, (I use 6lb Fireline), doubled for strength. Here is a picture of my newly warped loom, set up for the cuff I am creating.
Notice the outside warps are 'double strand' warps. This will not effect any portion of your looming, other then making it more stable to add an edging or fringe.

I suggested using Nymo, for the center warps, and Fireline, for the outside warps, because it is not only durable, but you will save money by not using something more expensive for every warp, yet you still have the strength your finished beading requires! In looming, the center beads truly take care of themselves, butting against each and holding up the warps.

Finally, I realize how I have been using a particular bead looming, to offer these techniques. Let me share a small photo of how it has been coming along.
I plan to explain every step taken, to create this type of edging, in up coming posts.

Sunday, May 9, 2010

Select Bead Color & Style!

I really enjoy using the "11/0 Delica Line" of beads, more so for the 'Bead Selection' available! There are more colors and finishes to choose, approximately 900! Other brands, or even a different size of Delica Beads, don't offer 'half as many'! I believe I know why....the closeness of the beads, in looming, actually force one color to react in a way unlike when placed next to another. As I continue to offer more about my bead looming, I will point out how this can be seen in many pieces I loom. For now, the finishes are what I want to point out.

So far, I have been sharing pictures and techniques, using the same bead looming. I felt it would be best to explain as I loom, so each and every step can be shared. Of course, I also plan on keeping some special ideas for my book!

The picture above shows the different 'bead finishes' I included. In particular, the lower left group of beads, on the loom, the 'Satin Line'. This is a line of Delica Beads which convey a true 'antique' look. They look like 'frosted cut' tiny tubes of glass. When used, in conjunction with other types of beads, they can offer such a unique character. I love including them in my bead creations. You can find them in the Delica #800's and some in the Delica #600's. They are all in a muted shade, or pastels, but glimmer with the brightest white, when your finished pieces are moved or worn.

Care should be taken when using these. Notice the picture below. This close up shows the finish quality of the 'Delica Satin' line of beads, against another 'Delica', a Matte Metallic. Not to point out the characteristics of the Matte Metallic, but to show the sharp edges and linear look of the 'Satin' beads. These are both size 11/0 seeds beads, and most of the other finishes are smooth like this Matte Metallic, except for the 'Satins'.

If you are including this gorgeous line of beads in your next bead looming, be sure to not pull the weft too taught, in a row that one of these type of beads are resting on an 'end warp'.

As seed beads are 'loomed', the most important part to keep in mind, is the 'outside' edges, or end warps. The center of your looming will take care of itself, as the beads rest against each other. I will explain this further, in pictures, when I explain how I like to 'warp' my loom.

Saturday, May 8, 2010

Line Up!

There are many ways to 'push' the loomed rows together, keeping them straight and even. The two points needing to keep in mind is:
#1 Not too tight, or your looming will have 'stripes' when you cut it off the loom.
#2 Not too loose, or your edges will not be even and straight.
The best way I have found to 'snug the rows of looming together perfectly' is to use my needle.

Before your needle totally exits the row, keep it in place and push the row up snug, then continue to pull the needle through. This will give you leverage because the needle is inside the beads, but sitting on 'top' of the warps. Once the needle is withdrawn, the beads will rest down, in between the rows, and harder to push up properly.

You will also want tug on the weft, after the weft is completely run through the row, to snug the weft properly. I realize how it may work with textile looming, leaving a loose loop on the outside edges, but with bead looming, it is important to pull the weft taught on every pass.

I have been using this same picture of looming, to explain many techniques. I promise to offer some 'meat with the potatoes', as I complete this cuff and share the finished looming!

Thursday, May 6, 2010

Short Weft, New Weft!

Thinking about changing your weft, can seem overwhelming, not knowing where to start. If you follow these steps, it can be very effortless and save more work, during the 'finishing process'.

Make a square knot, with the short weft thread you are changing, on the outside warp, where it exited the last row of looming.

In other posts, I will include how to make the outside warps sturdy, for not only holding your 'weft change knots', but also to offer sturdier edges to hold the fringe or edging you plan
to add, later on.

Once the knot is tied, you will need to think about how you are planning the edge or fringe.

If you are edging with a Brick Stitch finish, which I will go over later -


Pass your needle, after the knot is tied, through the same row you just exited. This will 'clog' the last bead, any future access will be 'denied'. This is perfect, for this type of edging, because the knot is 'gone' and you won't be running the needle inside any more.

If you are edging with a 'picot' or 'fringe' edging -

You will need access to every bead in every loomed row. Therefore, after the knot is tied, run your needle through the row 'before' the last row, allowing the knot to settle 'in between' the two rows of looming. This will keep every bead open, for future access, and the knot won't be seen once the other options of finishing is discussed. I will go over these another time.

I then threaded a new piece of thread, new weft string, into the needle and followed my last needle run, into the 'second to the last row of looming'.
No matter what the edging, you will always start your new thread like this.


Pull the new thread completely across the row of beading, leaving a small tail, next to the 'knot edge'. Tie another square knot on to the opposite warp edge. If you need to pull the knot taught, you can use the short tail you left, as the other side of pulling this knot.

The picture above shows the last three steps.
After tying the knot on to the right warp edge, run your needle back through the 'last row' of beading. Again, pull this taught, holding the little tail you originally left.

Now you can cut the tail, you originally left, being careful to only cut the tail, and not the new weft string.

You will be left with the new length of weft, running from the last row of looming and ready to begin loading your needle with beads and continue your looming.

As you can see, looming will require a bit of 'planning', i.e., knowing how you want to edge your bead work, so the steps taken during your process of looming, will eliminate steps during the finishing process!

Wednesday, May 5, 2010

Garner Your Beads!


I am working on a loomed cuff, just a simple 'abstract' design. Each progression is photographed because I want to note every thought and act, I complete, while looming. This will be included in my book.
Going over some of these photographs I realize an important aspect of threading your needle, for each row. There can be beads which are very different in shape and size then the others you are looming.
Be sure to 'garner' or 'cull' out beads that are not the same size as the majority you are looming. This will not only give your beading a more uniform look, but it will also keep the edge of the looming straight.

If you must, pull the entire row from the needle and thread, before you continue with looming. If you are using many of the same colors, and can just 'crack' that one out, and add another, do it that way. It is much faster and efficient, making this project that much more enjoyable.

Use a pair of needle nose pliers to 'crack' the culled bead. Hold the weft thread far off in one direction and be sure to crack the bead on the other side. Most beads are made of glass and will cut the thread when broken, if you crack the bead directly over the weft thread. Also be sure to wear some eye protection, because the broken glass bead will shard and fly. What I do for proper protection, is cover the entire pliers, holding the bead and taught weft' with a small handkerchief. This way the shards will not fly in your face. Notice the picture to the right, how the breaking point of the bead is away from the weft thread.

Since I work with Japanese Delicas more then any other type of bead, I have noticed there is a difference between the colors they offer. For instance, the Matte style beads are more fragile and not as regular in size, needing a bit more culling then the others. The Metallic line of beads are stronger and larger. The Opaque and Trans Delicas are hardest to crack! Just a side thought!

Tuesday, May 4, 2010

Tie One On

No matter how wide of a bead looming piece you have designed, the first row can become the most frustrating part of looming seed beads. With other ideas or techniques to cover, let me first offer this insight.

Tie your warp string onto the outside warp, either right or left, depending on which hand is your dominant hand and thread the other end onto a beading needle (sized for the beads being used and the length of what you are looming.) Load the needle with the exact number of beads, for the first row or the widest width of your looming (I'll explain where to begin your looming another time). Push the beads down or let them fall, meeting the knot you just tied. Secure your looming needle for safe keeping while you complete the next step (this could be lightly woven into your warps, softly prick into the sofa arm next to you, or even stick it into the felt lined base of your loom). Using two hands, push up the 'last bead' added near it's proper home, between the last row, opposite the row your knot was originally tied. Pull the weft string taught, as you add bead-per-row. Starting adding the beads to the row where the knot was tied, popping each bead up into place then moving your index finger to hold it there. Keep your index finger pushed 'upward' holding the 'entire row of beads just placed between each row of warps.

Your row should be 'wavey' and 'curling' in opposite directions. No matter how taught you pull the warp, you will still see the same thing. Don't worry, this is normal and you have done everything right!
In order to make the next row feel more comfortable, I can suggest threading a piece of wire into this first row, which will hold it straight and perfect for the next rows added. Be sure to use a piece of craft wire, which is a comfortable gauge to easily thread inside the seed beads. If you are using 11/0 Delicas, I can suggest using 20 gauge wire, but be sure to test your 'beads vs wire' sizes before you begin to thread this first row with wire. Your row will straighten up and make your future bead loomed rows lay perfect.


The wire can be of any color, because it is not a part of your finished looming.

After you complete another five to ten rows, you will be able to remove this wire and the rows will stay in a straight, uniform row.

Thinking Out Loud!

I know we all do it! For those who place many opinions, it is not a good thing. For others who can't organize their thoughts, it can be enlightening. Myself? I tend to use this 'thinking out loud' trait, often, and it seems to strike up conversations and offer 'outside suggestions' that give me options to consider. Whether I choose to use these 'outside suggestions' is another matter, but at least I can step back and see my work in a different light.

For my first Blog Post, I wanted to reason my 'writing down of inner thoughts'. What I find I really want to convey is how I am anxious to share some very cool bead looming techniques and open up a world that is not at the forefront of the beading community.

I am also working on my book, about looming. I'll be referring some specific questions, as I continue to update my Blog, i.e., Do you enjoy creating with Seed Beads? If so, have you tried Bead Looming? Do you enjoy the process? What is the most uncomfortable part of Looming? All of these questions can be answered and I hope to show that your answers will change as we begin to work together and learn more about this wonderful process, Seed Bead Looming!