There are many ways to create dimension, to a 2D looming pattern. One way is to add an outline, as I did here, for the basic design of my Lotus SLN. This gives depth without adding much more, but for me, it is adding an additional layer that I wanted to add.
It is accomplished much like you would complete 'bead embroidery', stringing three or four beads, taking a stitch then going back through the last two or three beads added. When I make my stitch, I am careful to only pick up either the warp or run my thread through a set of loomed beads. This way, I won't have any threads showing on the underside of my looming when finished, nor will I have to back my design.
To create the next level of dimension, I thread a 6mm Permanent Silver Metallic bead onto the thread, securing this bead in between the level I am adding and the base below. You can notice a few of these large beads, placed in between my petals. Some areas, I chose to add two instead of just one.
If you are familiar with 'Paper Tole', the art of cutting out the same design and reassembling the picture using silicone glue to make the picture look 3D. I call my method of creating dimension on this SLN, 'Bead Tole'.
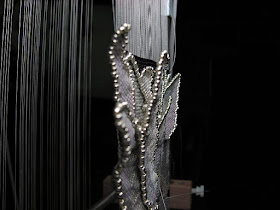
Looking from different vantage points, you can see the dimensions come to life. I am even including some 'cupped' petals which will also create a realistic feel, as in the petal on the lower right side.
From the front view, you don't notice the levels of dimension, but after adding more, you will be able to notice this picture from any angle.
There is many more parts to chart/graph and hand weave, which will finally bring me to my total picture. I have attached all that I have completed, to this point, and will be graphing out other portions to hand weave. The green leaves, in the lower part of the Lotus, will be some of the last parts added, as they stand further forefront.
Saturday, November 27, 2010
Sunday, November 21, 2010
3D Lotus SLN
My next looming is something I have shared earlier, but needed to take some time off to complete a few commissions and other projects. I'll be looming full force on this SLN, from now on. To start, I am sharing a picture of where I am to date.
In the picture above, you notice the loomed base of my SLN, being the large part of my pattern, A Lotus. Also attached are a few of the petals, I am hand weaving. The entire Lotus will be completed with 3D petals and leaves. Here are few that I haven't attached yet.
After I complete the bulk of the 'petal additions', then I will complete the lower end of the looming, all the while I will be scribbling and graphing out some interesting designs for the upper looming. The warp weights attached are giving me 'creative license' to make some neat designs!
Thursday, November 18, 2010
Final Pictures of 'A Glorious Day'
I named this Cell Phone Bag 'A Glorious Day' because the inspiration photograph was taken by Jean Upton, while she was on a walk/bike ride. The most appealing part of this photograph is the solid black background. I have been sharing stages of completion, but now I am glad to share completed pictures!
Below is a close up picture of the '3D Butterfly Wing', added as a focal to this panel.
The opposite side is loomed using the same color palette, of 44 different Delica Beads, but different Delicas were used as the predominate colors. My choice to keep the color theme going, had to do with how the fringe and strap are finished, reflecting both sides, of the cell phone bag.
Creating a spiral rope section, seems to be a good answer, keeping the strap strong. In this case, I used 10/0 hex cut, matte finish glass Japaneses beads. It spiraled up faster and offered that chunkier feel I wanted to acquire. The bead tubes carry out the same colors, as in both panels. Gems and Stones were also selected to match. I prefer to include sterling silver in between every bead, stone, gem or spiral, when I string up a strap.
As with many bags, cell phone or otherwise, they are more heavily used. Therefore, I always bead an epaulette, for each side. This way, I secure the four sides of the epaulette and attach the closed jump ring to the center. This gives a more security to the attached strap. I use jewelry wire to string my straps, ending with a lobster claw clasp. This can be removed, from the bag, for use as a wallet, or can be easily swapped out with an alternate handle. Notice that I also include three jump rings for the lobster claw clasp to hook on to, so there is additional strength.
A close up of the fringe shows how I used sterling silver caps. This, along with the opaque bi-cone Crystals, created the weight I was looking to acquire, making the fringe lay perfectly.
Looming a cell phone bag seemed to be something no one wanted to consider trying, thinking of all the warps needing to be managed. What I love about the loomed bag, is how they are supple yet sturdy and have no need to be fabric lined!
Friday, November 5, 2010
A Mini Mirrix!
I just received the Mini Mirrix, I ordered. This is adorable! I originally ordered this loom so I could start creating patterns for 'loomed earrings', but now that I have it in my hands, I see it would be great for loomed glass cases, credit card holders, small amulets, etc. The loom table is about 3" wide and is set up to warp 37 warps, or 36 beads wide (2" wide looming). If you are feeling courageous, then you could even add an additional 10 warps, throughout, which increases the width (just be sure to start in the center of the loom, center of your pattern).
This loom can also be extended up to 7" of looming, or can be loomed longer if you 'roll' your looming. Extensions could be considered for even longer.
One other great feature, I liked at first sight, it is very transportable. If you travel and want to include your looming, this is perfect!
I'll be finishing up the cell phone bag and try out an earring or two so I can get a few thoughts together for making some earrings patterns! I promise I'll share the pictures!
Thursday, November 4, 2010
Use Beads to Build!
I have shared how the 'butterfly wing' was added, for character, but I didn't show how to secure. I stitched the one edge, of the butterfly, which allows for the 'lift' of proportion. To complete this lift, I wanted to secure the opposite side, but not sewn that down. Therefore, I attached the other side of the wing by including a 6mm Permanent Metallic Silver bead.
This will give the wing the 'lift' I wanted to keep, and allow it to stay secure enough that it won't be 'flapping' around, while wearing the bag. This is a technique I do often, in my 3D building, adding beads underneath!
I have also completed a 'beaded spiral' and beaded some bead tubes, to finish the strap. The beads in the spiral are 8mm cut glass, matte finish. I love how they give the texture, in this spiral. I also used them in the center of two bead tubes! These, along with stones and gems I purchased and showed earlier, I will string the entire strap and secure.
The bottom of the bag is also closed, at this point, and I'll be fringing it with a short fringe, to include all the colors of the bag.
Tuesday, November 2, 2010
Design With Character!
Working to complete this cell phone bag, I wanted to stop and share how you can often consider adding 'something' that will bring character to your bead work. The original photo I used, for this cell phone bag, spoke to me as soon as I saw it! Great photo by Jean Upton!
I hand wove a portion of the butterfly wing, using my sense of 'dimension' and perspective. When you want to replicate something, ending up sitting further off the original plane, then consider making the added part wider and longer. Once it is attached, it needs the extra size or it will look smaller then the original picture part.
Here, I attached the wing along one side, on the left portion running along the body of the Butterfly. Underneath, I threaded a 6mm bead to become a 'cushion' so the wing will not press flat against the cell phone bag panel. I'll share more detail pictures later, when the piece is completed.