Saturday, December 17, 2011

Simply Edge while making clasp

Many design ideas tend to come together, while loom weaving. Sometimes, I even feel that my new idea is so good, I want my fingers to move faster. Then, I can finish what I am working on to start the new idea, before I forget it! Thus is a good reason to have a journal by you, while beading. So much is learned as you bead. The time it takes to create with seed beads, the more time you have to conjure up wonderful plans, for the next creation.

You may recall one of my recent cuffs, using C-Lon Tex 400 for the warps. I wove it 'row-by-row'. It was also the cuff being woven when I came up with a new idea of how to create a custom clasp. Here is the clasp I attached to that cuff.

Now I want to follow up with another custom created clasp,
for this 'Gerber Daisy Cuff'.

I will use gunmetal for all the findings, in this cuff. Gunmetal finishes will match perfectly.
There are some wild, fun, bright colors in this pattern, not to mention the extension of each petal and the over hang of my 'symbolic leaf design', so a simple edge would be best. The matte black is also a perfect color to extend, for this edge.

My personal favorite edging is a simple, single line of turned beads. I started using this idea on my weavings years ago. I call it just that, a ©Simple Turned Bead Edge.

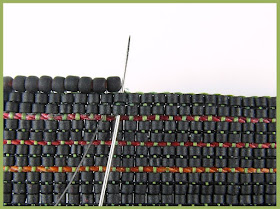
To complete this edge, you will be running your needle in and out of the last few rows of the woven edge. Usually, I am looking to not create a bulk of thread, turning my thread in and out of the same beads. This design, using the thick warp threads, don't make a difference. I'll be turning my thread through the same two beads, every pass because the line of thick thread will hide all of extra passes of thread. For a further design aspect, consider adding an 11/0 seed bead, every turn-up.


Many are already completed, but let me begin with how to do this ©Simple Turned Bead Edging. Above you see I attached a 11/0 matte black 'seed bead' (not Delicas, for this type of edging).

Below, I added another 11/0 matte black seed bead, but turned my needle back into the same row I just exited. Notice how I will be falling in and out of each bead more than once. It is the turn back out, that I mentioned above, where the thread could become too thick, turning at the same woven beads. The thick Tex 400 warp will help it not be a problem, but remember to keep this in mind, when weaving, with thinner warps.


Shown below, I am exiting to the right again. In essence, you will be looping your thread around sets of woven beads,  two hear, adding a single 11/0 seed bead with every pass, along the top edge.

Once you reach the end of the cuff edge, or are butt against the extended design, turn your needle and thread back through every bead you just added. This will not only secure them on the edge, but will eliminate them from falling forward and backward from each other bead, while being worn.


To complete the other side of the petal extensions, I attached a new thread, completing the same steps I outlined above.


Looking at this closely, I decided not to edge the side where I warped with C-Lon Tex 400, in green. Personally, I never leave a bead open along an edge, a pet peeve of mine, but the thickness of the Tex 400 carries enough weight to fill that gap, covering the entire thickness of the woven Delicas.

Knowing earlier I wasn't edging 'both' sides of the cuff edge, I completed the 'symbolic leaf design'. Otherwise, I would have edged, then added the leaf design. Since edging is a fixed step, in all of my woven creations, I think ahead as far as I can to realize what step is best completed first, an extended design or the edging.


Next, I will complete the fringe idea, but right now, I am still looking over my stash of beads to pick what I think will work best :)

Friday, December 16, 2011

Adding a free form leaf design

In the large black area, I continued to loom below the Gerber Daisy head, I will add a 'free form' symbolic leaf. This leaf will hold the fringes I am adding. But first, let me share how I added this design aspect.


In the picture above, you can see how I first strung 11/0 Japanese Seed beads on to a line of 12 lb Wildfire thread, in green. The strung section was roughly attached to my looming using the bead stops.

A new piece of thread, 10 lb green Wildfire, was threaded and followed inside the same pre-strung beads to attach the entire leaf section. A bead was added, during my second pass with the 10 lb Wildfire, to make the turn or a point of the leaf.


The thickness of the two threads helped to keep the green bead
shaped into the leaf design.

Below you can see I am also adding more 11/0 seed beads to create a double line, which will also be holding the fringes I'll add. Fringes are usually hung from the very edge, but this time, I am planning to start the fringes in the center of the looming. These beads will be that starting point.


Notice in both pictures, up and below, how I am using the 'warp' threads to secure all of my 3D accents. This is not only more secure, but I will not break any beads, should I need to make many passes to complete. When finished, you won't see any threads on the back of the loomed cuff base.


This is as far as I will add an accent. The fringes will be spaced wide apart, when attached, so you will still be able to see the Tex 400 cords used for warping.

Usually, I bead edge every cuff, but this time, I am only going to bead edge one side of this cuff. The edge, where the leaf design extends, will not be edged with beads. The C-Lon Tex 400 Cord, warped on that outer edge, is sufficient to create a finished edge. If I were adding a bead edge, I would have added it before I created the symbolic leaf design.

Saturday, December 10, 2011

Adding petals "off" the loom woven edge

I wove most of the Gerber Daisy, or the portions that will be 'the base' and will now hand weave additional, off the edge. I turn my loom in its side, to work on a horizontal level, with the one edge, completed on the loom.


These few lines are no where near the total length I want to complete, for a perfect fitting cuff, but I always stop to complete my 3D accents. This way, I will have a better feel for how much 'weight' these accents will offer, in the finished cuff. After adding all the petals, I will consider if I should weave further 'upward' to complete the proper cuff length, or weave further 'downward'.

I have preplanned how many petals and which ones will lay in the background and which ones will be front-n-center. Notice in the following pictures, how I skip a petal to add one, then return to include the one I skipped. Again, this is to keep a perspective of the petals and how they will lay in the finished beading.


This next petal will sit forward on the loom edge and in front of the two I just added. To allow an overlap, over the first two petals, I needed to begin with a ladder stitch. At the point I want this petal to meet the loom edge, which is the only way I want to attach it to this cuff, I will begin using the outer most warp to secure the rest of the same ladder stitching of beads.


I also want this petal to over lap the one I finished to its right. Therefore, I am adding more beads, in a ladder stitch, again not attached to the outer warp.


Following the base I created, the petal rises upwards. Both sides of this petal are now 'over lapping' the petals I first created, making this one 'front-n-center' of the three.


These over laps, I created, needed to be secured to the looming as well. I turned the loom up. This makes it easier for me to now bead further 'over' the original loomed pattern, following the original loomed pattern in bead colors.


This 'over hang' is secured to the original looming.


You can follow the next three photographs as they show how the rest of the petals were added, just as explained above. Each petal was well thought out for position and colors, before I started adding the first petal.


The last petal was added. I am happy with how they overlap comfortably create a realistic looking flower with a spray of petals. You can see, in the photo below, the bleed of each petal, over hanging the looming, blends in perfectly. It also secures each petal to the loomed cuff.


While completing each petal, I thought more about how I want to loom this to a perfect cuff size and how this Gerber Daisy will play a part in this final design. Therefore, I loomed further down, keeping the Daisy to the upper end of the cuff. There are still further rows, needing to be loomed above the daisy. Some to complete petals, and a few to handle my clasp idea. Other than that, I loomed more rows to fall below the Daisy.


I have some ideas in filling out the lower portion of this cuff, but it will have to offer a balance to the glorious weight, of the Gerber Daisy Head, above. The C-Lon Tex 400 warps, in the colors I chose, stand out so nicely against the matte black Delicas. I don't want to hide these, but I do want to balance this cuff.

Monday, December 5, 2011

More about weft color selection & Delicas

During the planning process, of looming bright colors using C-Lon Tex 400, I had to make a weft color decision, that truly makes a difference. I have always suggested using 'just' white weft threads. They won't show between the rows and offer the bead color selections a chance to really shine.

Using The thick cords, not only adds to the over all width of the looming, (keep this in mind for the type of clasp you will be measuring to add), but also makes your weft thread color evident. In the picture below, you can see the 'green wefts' crossing over each if the Tex 400 warps.


I could have selected using black, which would definitely tie into the over look, but I wanted to continue the 'wild' or 'unorthodox' feeling these threads and this design offer. Now you can see the green wefts crossing over and it doesn't give you a feeling of being out of place at all.

Also, my bead finish choices played a part in the weft color selection. I decided to use only opaque finish beads. This way, no matter what color weft I chose, it didn't effect the true bead color I want to keep. [Link from a previous post regarding the weft color choice.] Remember to keep these points in mind, when you plan out, looming with C-Lon Tex 400.

You'll also notice a difference in how you run your needle back through the looming row. The Tex 400 forces the beads to hang 'below' the thick threads. If you feel you have a hard time pushing the beads up between warps now, more prevalent with 'tubular shaped beads' than with other seed beads, ready yourself to push harder.

I would run my needle, back across the row, taking a section of beads at a time. This would include just the beads that lie between each set of Tex 400.


This turned out to be a very relaxing form of looming, for me. I know it takes more time, but it feels right.


Finally, I am not known for pointing out any of my mistakes, but for the sake of sharing all I know, I'll point out the bad choice of a bead I made. This confession should also be a good learning lesson......notice the beads in this picture again, the same I posted first.


The circle points out a bead, not as perfectly sized, for a Delica. Yes. Delicas are not perfectly shaped as we think. More times than not, I read how people suggest Delicas being perfect for bead looming and having an evenly sized bead to loom. They are much more even than most seed beads, but still have their faults. You may consider a bit of culling, during your looming with Delicas.

Some colors are blatantly different, in size and shape. For instance, the matte black is a lighter and thinner bead, than the opaques sold by Miyuki. If you do want to consider a very precise shaped bead, much more even than Delicas, Aikos. They are expensive and do not come in the same number of colors, as a Delica. I would suggest everyone buying at least a few colors and trying them out. For me, I love having over 971 colors to select, growing each year, and will continue to loom with Delicas.

Friday, December 2, 2011

Creating more with C-Lon Tex 400 Thread

My further interest, experimenting with alternate ideas to warp, and the colors available in C-Lon Tex 400 Cord, brought me to create my next pattern and cuff. I want to share my thoughts, as I go, so maybe you too can find something useful to incorporate as warps, for your own creative bead weavings.

I pulled out these bright colors and matched it with using black Wildfire. Notice the difference in thread thickness, between all of the selections I made. This should create a texture, as well as a unique design to weave.


Furthering my interest, to work up different free-form designs, I warped the loom in an A-Symmetrical arrangement. I could have warpped less for each row of beading. There is no reason to have 'warps' separating 'each bead'. This too will create a different look.


Below is a sample of how I once wove a pattern having more than one bead in between two warps.


It may be hard to notice, from such a close up picture, but by eliminating the number of warps, between each row of beads woven, you can brighten the color of beads even further. You may recall I always recommend using a 'white' weft, no matter what color warps are being used. The white also brings out the brightness of a bead color, but less warps, too, also create that 'wow' color.

I haven't tried weaving more than three beads wide, in between two warps, but it is safe to say you can securely weave two or three beads wide, with two warps.

Now that I explained my warp color intentions, let me share a picture of how I played these warps into my pattern idea.

I am using a matte black background so the bright warp colors will shine through. These were placed so the warp color seems to have 'bled' the same color from the pattern I am weaving.

We will be loom weaving this cuff together, in pictures and blog posts, so you will see and understand some of my thinking on this idea. Again, my warp management methods will allow a finish with such thick warps.

Finally, This may seem to introduce an inner desire to weave with textiles, but I really do not think I'll leave my 1,265 Delica colors, on the shelf!

Tuesday, November 22, 2011

Adding character to a finished cuff


I made a small change to the 'Tangled Tree Light' cuff, shared in an earlier post, below. The addition of an 'electric plug' added the character I try to include, with all of my loomings. This idea, in particular, was suggested by someone who saw my original cuff, thinking the tree was a 'plug'. I ran with it, finding these brass plugs.

Try to continue your design, off the loom too. Many times I write about how a looming falls on the 'pattern idea'. One reason is due to the 'two dimensional' aspect of looming. The pattern idea, or graph, is what makes the beads jump off the warps. Adding a twist, to the already great pattern, makes a difference in your piece being cherished, for more than just a loomed art!

Wednesday, November 9, 2011

A Victorian Feel, Simplicitic Cuff


Title: "Layers of Sunshine" (2011)
Designer: Erin Simonetti
Techniques: 11/0 Delica Loomed Layers using the Extended Pattern Format, Kumi, Warp Threads, Antique Bronze Metal Accents, Custom Created Bronze Clasp
Beads: 15/0 Japanese Glass Beads, 11/0 Delicas, 3mm/4mm/8mm Swarovski Glass Pearls (Burgundy), Antique Bronze Metal Beads/Caps/Chains


I have completed the cuff, I was sharing below. Now you can see the finished piece knowing how I loomed each row, to allow for the large Swarovski Pearls to be incorporated into the pattern. Otherwise, I would have not been able to recreate a swirling, of the pearls, but maybe a straight line, as in the earlier Kumi Warp cuff shared below, too.

My thoughts were to allow the green color, of the Kumi Threads, to show along with the gold lined Delicas and Burgundy Swarovski Pearls. This is one reason I did not edge the cuff with a beaded design, as I usually do. I did want to create a bit of movement, so I included a few dangles of wire wrapped pearls and bronze findings.

The clasp is something you will see more in my pieces. It is custom created using filigree stampings.


Originally, I completed the cuff with many more dangles, under the center medallion, but took a second look and started to clip them with my cutters, like pruning a rose bush. I left the center three, thinking they are just enough and not too much to take away from the simplicity of the cuff's design.

I just ordered many more colors of the thick thread, so I plan on working with other colors and ideas. I also have a strange need to work a bit with strands of pearls or crystals :)

Monday, November 7, 2011

A Tangled Tree Bulb, Cuff!


Title: 'Tangled Tree Bulbs' (2011)
Designer: Erin Simonetti
Techniques: 1.8mm Glass Cubes Loomed, 3D 15/0 Japanese Glass Beads accented on top as the wires, 8mm Permanent Gold Metallic Glass Beads edging, Crystals, Doll House Light Bulbs, Antique Bronze Metal Findings.
Beads: 15/0 & 8mm Japanese Glass Beads, 1.8mm Glass Cubes


I guess I am slipping this latest cuff in to the mix of what I am presently looming. Our FB Group, 'A Bead Looming Intervention' is having a swap. There are two themes you can select to join, 'Holiday Theme' or 'General Theme'. Our photos of the completed cuff is due my 11/12 then it should be packaged and sent to the corresponding recipient by 11/19. This was such a great way to get to know each other Member better and realize what a wonderful group of talented loomers we have! I'll be sure to post the cuff I received!

Wednesday, November 2, 2011

Detailing the Design


I have completed looming each row, as shared in the post prior to this one. Now I am detailing the scroll of pearls, included in this graphed pattern.


Here, I am connecting a line of 15/0 glass seed beads, in a similar Ginger color, as the Swarovski Pearls.

The added pearl design gave an interesting look, of the over all looming, but now that I am detailing it, the scroll pops!

Just another way you can add some interesting design elements to your looming. I like looking for ways to add that third dimension, but sometimes it turns out to be more important to add this dimension to detail the design.

Friday, October 28, 2011

More looming with Kumi Threads


I strung my loom with more Kumi Threads. This pattern is taking me into something totally different, for me. I am looming one row at a time so I can complete a pattern I created. This is something along the lines of a fillet crochet pattern. Keep with me as I will post as I progress, with this very new idea!

Thursday, October 27, 2011

Kumi Warps...Loom weaving 11/0 Delicas!


Title: 'untitled' (2011)
Designer: Erin Simonetti
Techniques: 11/0 Delica Loomed using the Extended Pattern Format, Kumi Warp Threads, Appliqued with Metal Accents
Beads: 15/0 Japanese Glass Beads, 11/0 Delicas, Antique Bronze Metal Beads/Caps/Chains

As a follow up to what I have been sharing recently, I can now offer the completed cuff. I love the use of Kumi Threads for the warps and will continue to pursue this avenue. The warp management methods I offer make using any thread, for the warps, fair game. Even wire!


You can see in this photo the wonderful body and stiffness the Kumi Threads give the final cuff. Yet, it is still quite pliable and comfortable to wear.

Monday, October 24, 2011

Zipping up the cuff has begun!


I am using Antique Bronze findings for this cuff. The caps really add some additional interest to the design.


You'll notice I started zipping in the center of the cuff. This made it easier to center the entire zipping portion down the middle.

I'll also be adding some hand woven extensions, after completing the zip.