Visit My Website, A Personal Gallery!


Click on Logo Bar Below, to visit my website!


Wednesday, June 30, 2010

Design ideas can hit fast!

I was recently inspired by a cuff, beaded using the colors of Turquoise and Red. It wasn't woven on the loom, but the 11/0 Delicas were woven in the (3)Drop Peyote Method, (not 2 as I first wrote!). This design idea hit me so fast, I stopped working on a new detailed cuff design to make this cuff, using my favorite method of beading, looming.
Here is the base.
I used the colors seen in the peyote cuff, (Turquoise and Red), but I opted for the 'Color Lined' group of Delicas. This line of Delicas have an awesome 'glow' about them. When these beads are loomed, your pattern seems to 'vibrate' with color.

The 'Color Lined Beads' come in many variations, i.e., inside color can be every color offered by Miyuki, but the outside glass color can offer many choices as well. There can be inside white with outside topaz, inside yellow with outside green, etc. The 'Color Lined Beads' I chose, for this cuff, are a dark turquoise/clear glass, a light turquoise/clear AB glass and a gorgeous bright red inside/clear glass.

The looming shown above is just the base of this cuff design. I am attempting something new, but it seems pretty 'cut & dry'. I loved the look and hope to replicate it with my 'Loom'! I'll share more photos as I progress.

Thursday, June 24, 2010

Offering you something to think about!

Let me offer something more to think about, today!

Looming my 'weighted warp method' (briefly described below), using beads already strung on some of the warps or looming sections and rearranging them as you loom!

I have finished a few pieces like this and look forward to sharing these pictures, but for now, I want to offer you something to think about, since we have been sharing this method. My idea of 'not' sharing pictures, may leave your interpretation open to some personal 'creative goodness'! Let me offer that idea before I share photos!

Wednesday, June 23, 2010

The Mirrix is perfect for the Weighted Warps!

I have completed my base pattern, for this cuff, which includes my personal technique of a 'wavy loom woven edge'. The Mirrix did an outstanding job and is designed perfectly for this method of beading.

No finagling with the weighted warps, as I have with other set ups trying to complete this same method of loom weaving. Depending on the pattern, each of the weighted warps move up in various lengths. This is where the suggestion of a 'bobbin' comes into serious thought. However, I did 'swap out' the outer right two weighted warps, when my right indent was the furthest inward. Notice where the bobbins lay now, opposed to an earlier picture, below, when I started.

I'll be including finer details of the finishing process, but I do want to share one detail that may make your loom weaving better if you know ahead of time and would like to try this method out now. The outer weighted warp is shorter because that warp has a tendency to be 'pulled inside' of the end bead. The picture below shows how the warp is 'inside' the end bead, when my needle has it's final 'pull', securing a row.

So if any of the warps are in need of a bobbin, it would have to be the 'outer right warp', for any pattern. Don't pull the warp so far into the bead, or your weaving will 'ruffle' along this edge. Logically, with movement of your woven piece, while wearing, the threads loosen up. Therefore, having too much 'warp inside', it will work its way out eventually. I offer a finishing technique that finalizes this 'weighted warp method', and limits the amount of 'slack' caused by the outside warp. This step can be completed 'with' or 'without' adding a 'bead edging'.

The base pattern is complete! Here is a picture of the cuff, titled "Rapunzel"!


Not much more till this cuff can be worn, but these details will be offered later. I always suggest knowing your exact ending, before you start. This is important for mapping out your pattern, as well as how many rows you need to weave. I have offered a little insight into 'mapping out your cuff size', in an earlier post. But again, you should start to get a feel for the 'number of loom woven rows' vs. 'measurement when cut from the loom'. I'll also start to get into how to consider the clasp attachment and the different styles to consider, at a later time.

There is one other technique I would like to work, on this Mirrix Loom, I think it will work beautifully. I also want to complete a Split Loomed Necklace, with some of my usual loom weaving techniques used in all of my work, as well as weaving another cuff with a theme seen often, but not in the manner I hope to pose! Again, I'll be sharing thoughts along the way!

MCN:EG9V2-117QX-23T1Y

Tuesday, June 22, 2010

Managing the Weighted Warps

I have completed quite a few more rows, in this pattern, "Braiding". You are able to see more of the design, now.

The reason I decided on this pattern was it shows a 'slight indent'. I didn't want to proceed with a pattern offering too deep of an 'indent'. This type of indent was going to be manageable with the new warp set up. I have done indents with many more rows, but won't get into it's properties just yet. Even with only a 'four warp' indent, there are minor points that need to be kept in mind. For instance, keep the outside bead, in each indent row, very loose, until you are ready to add it to the needle. These fine points are really for my book!

Let me also show you how the 'weighted warps' have moved.

When this original design idea was shown to Claudia Chase, owner and designer of the 'Mirrix Loom', she suggested an idea not shown here. She thought I might want to consider the 'bobbins' used in Kumi Looming. This way the warps would be wrapped around the bobbin and unwound when more length is needed. I own some of the bobbins, and considered that, but the weight of them was not enough to keep the warps taught for the looming. If the warps are light, they almost get 'dragged' inside of the last bead of an indent row. However, her idea truly has merit, because you can see in the picture above the right weighted warp is much higher and used more often then any of the others, in this particular pattern. What I plan to do to correct this unbalance is to 'twist' out the longer weighted warp for the 'shorter weighted warp', next time I am the furthest indented. I will also have to adjust my 'center spring' to accommodate this swap.

This is only about 3 inches long, so I have another three inches before the looming is completed. The final stages, of finishing this cuff, will be included in another venue! I will, however, show more of this looming before I get to that point!

MCN:EDPNP-Q4D65-S7YTT

Monday, June 21, 2010

Weighted Warps Need the Center Spring

There is so much to share about my weaving techniques. I can't offer every means I use to weave beads on a loom, but let me share this one.

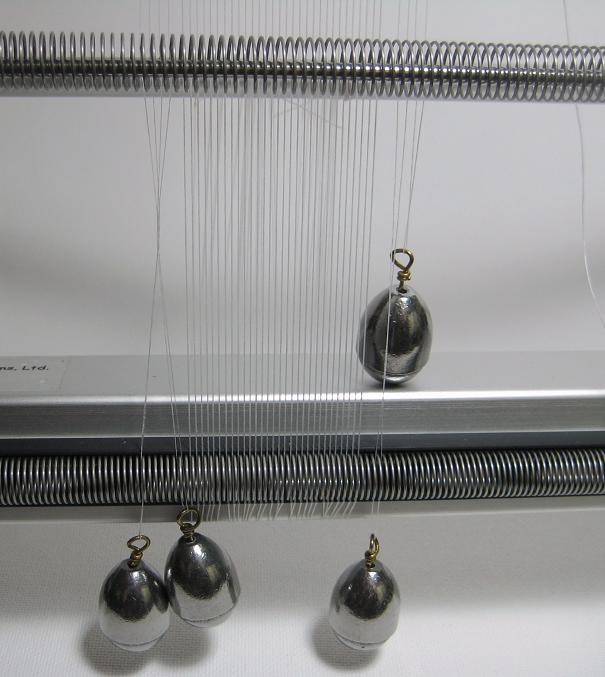
The 'Weighted Warp' method can be set up to use on any 'vertical' style loom. I chose the Mirrix Loom because of some accessories they offer which help to make this easy (including a center spring to hold the weighted warps steady). The Loom is set up as standard directions denote, warping only those warps, which will be stationary and not used for 'increase or decreasing'. Therefore, count the number of beads you will be using for the 'movement in your beadwork'. My example has 'four' beads, on each loom edge, which will be creating an 'indent'. These four warps will need to be 'moveable', so I will thread these warps using 'weights' to hold them down, but allow them to be moved, as shown in the picture below.

The spring you see, in the upper portion of this photograph, is an additional spring to 'center' the weighted warps. A thin rod is then placed inside the spring, in front of the warps, to hold them in line, while the lower weighted warps move up to accommodate the pattern.

Now that the loom is strung with the correct number of warps, and the proper number of weighted warps, begin weaving the 'longest' row of beads, shown in your pattern. This row will be your constant, holding your rows together.

To indent, add your next row of beads. When you return the needle through that same row, as you do with every woven row, be sure to 'loop' the weft around the end warp, grabbing it to pull 'inward' towards the last bead on your row.

Because your four outside warps are weighted and not attached to the base of the loom, as the other warps are secured, this warp will be flexible to move inward as needed. Continue to decrease your row of beads, and continue to loop around the necessary weighted warps to pull them inwards.


You will notice the weighted warps starting to move upward towards your weaving. They will eventually pass the lower spring, but the 'center spring secured with a rod' will not allow you to loose their alignments.

Your rows can be indented as far as your pattern suggests. These can even be increased back to the original number of beads in a row.

Because I have weighted warps on each side of my woven warps, I can increase and decrease on each side of the beadwork. I am creating a full pattern of wavy edges. When these are completed, I will share how I edge these to complete the look and structure of this method.

There is much more to weave, to complete this cuff, but I'll share more as I progress. This pattern will have multiple indents and increases, before it is complete!
Copyright: MCN:EDHK5-HUVWN-ML5XS

Saturday, June 19, 2010

Weighted Warp Method

I am attempting a very new idea. My thought is to loom a cuff, which will be designed to have a 'wavey edge'. Usually, loomed pieces are 'straight', because it seems impossible to manage the short warp threads between each short row of looming. Hopefully I can change this!

I finally sat down and assembled the Mirrix Loom. It seemed overwhelming at first, but all the parts came together quite easily. Here you can see the loom assembled and my warps attached. Notice the double warp bars. The Mirrix Loom comes standard with 'one warp' bar, but I purchased an additional warp bar.

The reason I decided on the second warp bar, is the original directions state to wrap your warp thread around the one bar, up and around the base and top, thus creating a 'double layer' of warps. It seems that was too much of a thread waste for me, so the additional warp bar allows the one end of the warp thread to be tied at the top and the other at the bottom. This now creates only one layer of warps threads.

To create this technique, wavey edging, I needed to make the four outside warp threads 'adjustable'. Initially, I tied a third warp bar with rope, to hang from the top of the loom.

After assessing further, this method will not allow each of the four outside warps to work 'independent' of each other, which is what I need for this wavey edge idea. So I decided to purchase some 3/4 oz. fishing weights, hanging them in the loop of two warp threads.

I'll be starting at the top of the loom, top of the pattern not in the center, as I usually advise.
If this works out, a Mirrix Loom may be the only Loom that will allow this method of looming!

Friday, June 18, 2010

Advantageous Views

Sometimes, when seeing your bead work in photos, an entire 'dimension' gets left out. While presenting our beading in pictures, it is helpful to see many forms. Of course we want to look for the close up, getting an idea of each detail, but also seeing the piece on a model, helps to gauge size and its wearable aspects.

In a prior post, I displayed my recent cuff, NSW Cuff. Prior to that, I also shared my progress and designing steps. I now want to offer pictures of this same cuff, worn on a model (my daughter Olivia), to show how it looks while worn. I am sure, if you have been following these posts, you will get a better feel for this looming, by seeing it modeled.

Seeing the work in this manner gives you are better perspective. I have to be reminded, from time to time, to offer these type of photographs myself. I want to share these thoughts so we can all show our beading to their best advantage!