Visit My Website, A Personal Gallery!


Click on Logo Bar Below, to visit my website!


Tuesday, December 28, 2010

Create a Bead Program Color-Journal!

I am versed in every bead pattern program available, purchased or found free on the Internet. In working with each one, trying to learn more about getting that perfect 'bead color match' it became evident that you must learn how to 'edit each bead color' offered in the pallet created by the Programmer!

More times then not, BeadTool4 is owned by more Bead Artists, then any other Bead Pattern Program. The cost is reasonable, it is very user friendly, the Customer Support is timely and Bead Pallets are kept updated. For these reasons, I have decided to use this particular Bead Pattern Program to discuss the necessity of honing the bead color editor in any program you prefer to utilize!

Even though there are many bead colors, stored in my Delica Pallet (originally created by the publisher) of BT4, needing to be 'tweaked', I'll just use one Delica Bead Color right now to show how every bead color in your pallet should be touched or double-checked.

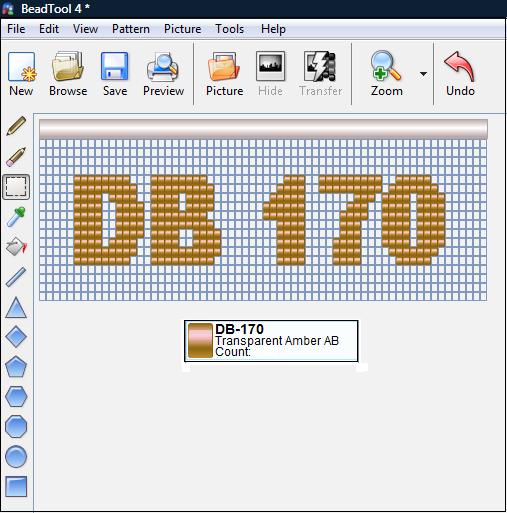
I created a loom pattern in BT4, using all the right steps to create a gorgeous pattern.... so I thought! Once the requested Delica colors were pulled, from my on-hand stock of colors, I realized there were some poor choices made by the program's Bead Color Selector itself. For example, the color DB170 was chosen for a portion of my pattern, denoting an area of 'dark maroon tones' in my original photograph. Take a look at the Bead Color choice below, selected by BT4:
Now look at the bead cup below. This is the 'actual bead color' requested by the Bead Program, DB170. Looking at both, back and fourth, you'll notice there is a grave difference in color hue, tone and intensity!


Anyone who has created a pattern, in a Bead Program, has realized a great change in the 'completed bead Art' vs. the 'actual pattern generated', only after the beading is completed! Your heart drops and you start to find the positives, in what you completed. No doubt, you should! Anything beaded with time, passion and enjoyment, is something to be proud! But then, step back and realize how you can 'tweak' the actual Bead Program, so you can begin to build a firm foundation of proper color selections, for future patterns and bead creations!

Shown below is a montage of steps I take to make the color corrections, in my own personal bead program pallet, no matter what program I am utilizing. The original bead color request is shown on the left, with the necessary changes on the right.


BT4, like every bead pattern program, offers a way to change or recreate the proper color, for each bead color. When I make such color corrections, I also change the name of the bead and color number by not adding the DB to the new color number. This denotes to me that I have made such corrections already, in my pallet. You may find another way, to mark these changes for your own pallet!

There are over 971 different Delica colors. It is a timely undertaking to create the proper combination of color/hue/tint, for each one of them. The Programmers of every Bead Pattern Program, has no easy task. Therefore, I would like to also show how such mistakes might have been made, during their pallet creating process.

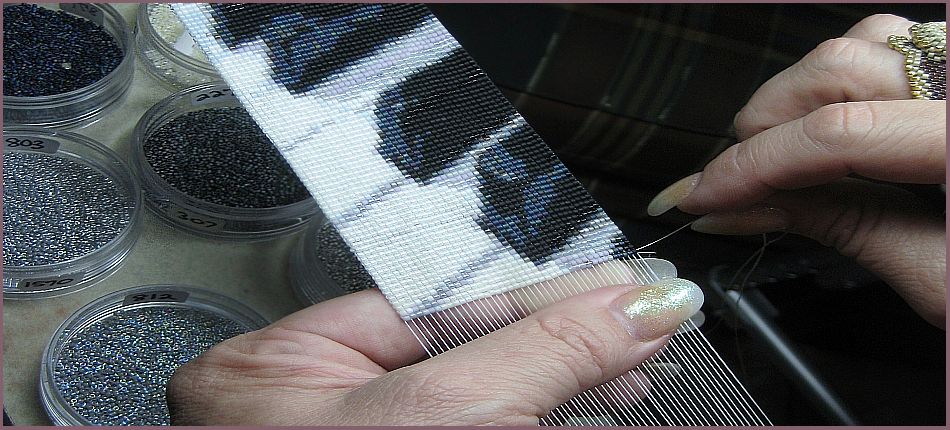
This picture shows a close up of DB170. It is a transparent bead, which allows light to enter the bead changing its intensity under various lighting conditions. Along with that, bead also has an AB Finish, (AB stands for "Aurora Borealis", which means "Northern Lights". It is done with a special process that puts a very thin layer of metallic atoms deposited on the surface of the bead.) Because it creates a rainbow of color, selecting the proper bead color using a cursor alone is not a concise method to denote an AB bead color. This is how the color is 'picked'. The small point of the cursor can pick up any one of the multi-colors this type of bead reflects.


My 'Paint' Program was used to show how many color variations you can find in this same cup of beads, DB170! I used the 'eye dropper' (color select) and the 'paint pail' (color fill) to create the sample card below. Notice all the colors I was able to pick out of this same bead cup! I could have found more, if I wanted to continue!
(On another note, many bead artists use this very method to create a color wheel for some of their creations as it can denote the best marriage of bead colors for any given project!)


Therefore, you can see how a Bead Program, offering you a base of bead colors, can make color mishaps that relate to a poor pattern. No Bead Pattern Program is created to offer 'perfect pattern and bead color choices', from the start. Each new Program should be considered your journal and the input you offer, from each pattern you create and color correction you make, will compile the perfect base for all your phenomenal personal patterned creations!

In closing, reconsider purchasing any bead looming pattern that doesn't offer the finished looming as a sample! It would be different, if you are looming a pattern given 'free', but to invest in a pattern and the cost of any requested bead colors, which can change in so many ways, may be disheartening! To keep a positive feeling, about creating loomed bead art, consider investing in a Bead Pattern Program. You can begin to learn how to use it, tweak it so you build a program that will work with your creative style and not hinder it!

This sample was using a particular bead pattern program, but every program created for the purpose of making bead patterns have to be 'worked'. There isn't a program available that offers a 'click, perfect pattern' option!

FOOTNOTE: In a reply from another bead artist, I think I should also mention: "It isn't much work if you double check your colors for each pattern, making changes as needed. Soon, you will have more completed then you think! Also, I guess I should have added that 'not every bead color needs to be adjusted and not every bead in every program"! I would just remember this blog post and add the motions to any pattern you may create from here on out! Your style of patterns may even limit you to using more colors then others! Adjust as you go... Makes it much easier. Be sure to also mark each color you have already changed by either marking it's name or adding a letter to the DB#.

Monday, December 20, 2010

Trice Edging!

Time, these days, is so precious to all of us! Even I am looking at ways to create the same level of quality loom weaving within a shorter amount of precious time! I want to share a technique I have been perfecting for a while, "Trice Edging"! This method allows you to 'weave and edge' at the 'same time'! Below are the steps in pictures.

String your loom as you would start any new loom project, warping one thread more then the number of beads wide. Now string on a good number of edging beads, or 5 more than the number of rows to weave, an 11/0 round, not tubular like a Delica. This type of bead lays much nicer for this simple line edge. You will want to thread 5 or so more number of beads than the rows you plan to weave. These can be added after the initial warps are strung or string the beads first and warp the loom with the two extra warps stacked with beads.

Attach your weft to the outside warp of your bead row, not the same thread holding your edging beads. Weave the first row as if the two outside warps with beads are not there!

Just after exiting this row, slide an edge bead up and run your needle inside, towards you.

Now add the next number of beads needed to weave the next row, in this case there are ten beads creating this narrow banding.

Before turning your needle upwards and running it back inside the same row of beads, above the warps (the usual loom weaving methods), pick up another edge bead from the other side.

Now you can continue the loom weaving technique of going back through the row of beads, keeping your needle above the warps.

When you exit on the starting side, pick up another edge bead, just as you did in the first step described. Continue weaving these steps until you reach the desired length of weave you need.

This Trice Edging Style, creates a simple edge with the edge beads sitting on their sides. This also finishes the weave to a classic look, no holes or threads showing!


I have many other variations of this same method, creating edges much more intricate then this. In the meantime, you can experiment with adding more or less beads and additional warps full of beads! If you plan on creating a scalloped type edge, you'll need to keep those warps free for movement as the warp threads will be used up or longer, than what you attach to the loom.

Sunday, December 19, 2010

An Adjustable Clasp on a wide loomed cuff!


I just completed another cuff, with a design fit for the season! This is titled, "Who-Me Deer?". It is a 30 bead wide loomed cuff. When I create such a wide cuff, my main staple of clasp choices become a slide tube clasp. They have a long presence, mostly 35mm. I never cared for the design of a 'single loop' or 'small single clasp' on a wide cuff, because I wouldn't want it to flip or flop around on the wrist. I also feel that a single, small clasp, of some sort, on a wide looming, just doesn't offer a proper 'balance in design'.

The adjustable aspect, of this design, is also something I am sharing. It can be difficult to loom cuffs to an exact fit, without having the model to refer, so an adjustable design can be a great feature.

I call the end caps, seen in the photos above, my 'crunchy clasp' method. The reason being that beads are 'cracked' when they are attached. It can be very uneasy to think about the beads breaking, but my technique keeps the cracking of beads into consideration, long before I have to attach the 'CC's' to the ends!

The one end of this cuff is finished with a copper chain, for the adjusting part, topped off with a dangle, a custom made 'snow globe lamp work bead'. On the other end is a copper wire hook clasp and matching stones, again wrapped in copper wire.

Above is a montage of the edging. The large beads are 'copper barrels' aligned perfectly between four rows of looming. There is a 'stop bead' two beads inward because I wanted the barrels to lay directly next to one another. This stop bead allowed me to enter a row of looming then exit the same row of looming. To secure the large barrel beads further, I strung a strand of copper 11/0 glass beads, directly inside the entire row. This will keep each barrel bead in line, especially while being worn or bending the cuff. The opposite edge was finished in a simple copper color Permanent Finish 11/0 glass bead.

This method of clasping a loomed cuff can be the simplest way to manage the warps and still complete a cuff in a professional finished manner!

Thursday, December 9, 2010

Designing A Pattern: What Approach Is Best?


Many factors are considered, when a new pattern or design comes to mind, but what approach do you take? I tend to approach my new creation from a 'subject/design' standpoint, as opposed to 'what will my stash allow?’ Either direction takes many winding roads until completion and both can be a perfect way to create. I have been thinking about this often lately and want to share some of my thoughts about each option.

A SUBJECT/DESIGN IDEA IS THE DRIVING FORCE:
This direction has it's positives and negatives. The positive is that you will more then likely increase your bead inventory! Negatively, it will end up costing you more money then you would have spent, just using what bead colors you have on hand. Having said that, I would like to share this piece of advice about how to acquire the necessary bead colors.

If you have created a pattern, about the subject/design you want to loom, make sure you are narrowing the pallet down to the least number of colors, without loosing detail. Also, double-check your pallet to see if there are any colors that look very similar. I would merge these two, but first see where they lay in respect to the other. Also, every color hue/tint is offered in every finish style. Therefore, if you see a 'luster sea green' that is the same color/hue as the 'matte sea green, then make a choice between the two. More times then not, the finish style won't make a difference in a pattern as much as the color/hue choice would.

Finally, look over your bead count, for each color. There are approximately 200 Delica beads per gram. Notice how many beads will be needed per color. Calculate how many grams are needed per color. There are two companies, I know of, that sell Delicas by the gram, as opposed to most bead suppliers offering 4gram, 7gram or 10gram tubes. Buying by the gram will keep the supply cost lower, if you find you just have to loom a design using colors you don't yet own.

WHAT WILL MY STASH ALLOW?: This just may be the most creative direction to take, when starting a new bead looming. Those who prefer to design, from this direction, must be admired! I personally find this more difficult to juggle, "idea vs. stash". I will admit though, after I am well on my way to finishing up or needing to create the perfect edging, I do switch gears and take this approach. I'll look over what I own and can find those 'Ah Ha' moments very rewarding!

Would it be fair for me to say that bead artists who approach their new creations, from this direction, also have created gorgeous Free-Form and Bead-Embroidery? I am not sure of how these thoughts would play into this approach, because I have not tried either, but I admire those pieces completed in these two bead weaving techniques.

How do you sum up your approach to starting a new bead loomed creation?