Visit My Website, A Personal Gallery!


Click on Logo Bar Below, to visit my website!


Thursday, January 31, 2013

Valentine's Day, Celebrated, on the Loom!

I think I will celebrate seeing over 1,000 friends, enjoying my "Page", on FaceBook, Beads Beading Beaded, by sharing a "sneak peek"! I've never created a Valentine's Day themed cuff, for the loom, before. Hoping to offer you some fun vibes, too, I am making this new cuff a "share as I go".


Not seeing any red? Give it a few more rows, lol! Here's a hint: It is a well known line, but never seen on a loom before.

Sunday, January 27, 2013

Baltimore Ravens Superbowl Jewelry


I just completed the cuff, I was previously sharing in my last post.


Applique on top of a loom woven base. The base edging is Swarovski cut crystals and Jet Black 2mm Swar beads. The football fringe are created using hand painted foot balls, crystals and sterling silver findings.

Now, off to create a pair of "SuperBowl" quality earrings!!

Wednesday, January 23, 2013

Super Bowl of Cuffs, and
a BeadTool4 Suggestion!

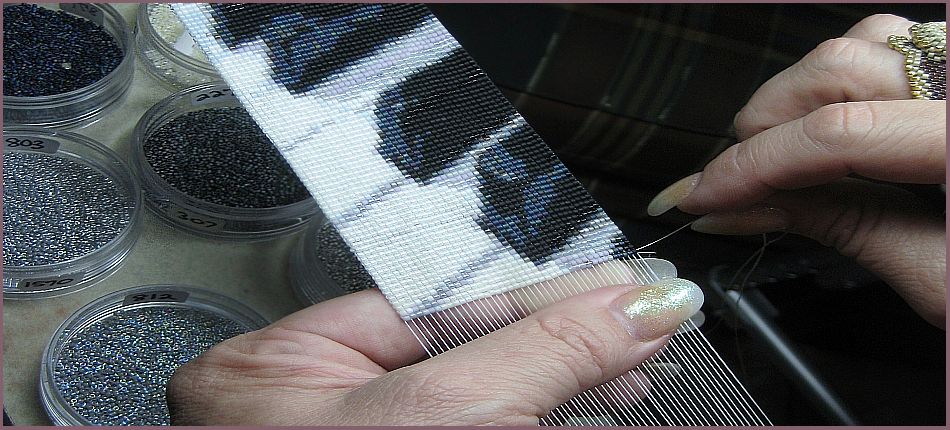
I guess everyone knows...my 'Baltimore Ravens' will be in the 47th Super Bowl extravaganza, this February 3rd. Therefore, I decided to make myself a cuff, for the game. Even with so much else going on, in the looming front, around me, I thought I should make something, for myself!


The picture above, shows a small part, of what I have in mind. I'll be sharing a bit more, in hopes to offer some insight as to how I design such intricate cuffs.

This started off as a drawing of an oval, on a 15 degree angle. Adding that illustration to BeadTool4, I created the Ravens head behind it. My first attempt to make a proportional football, was a desaster. But, by changing up the 'actual bead height/width', in the BT4 Program, I was able to create the perfect shaped football. I find a 'height of (8)' and a 'width of (10)' weaves up, on the loom, to be a perfect circle. Making any other form, from that, with these same dimensions, you can create the perfect shape, in 11/0 Delica beads. I am sure many know how to change this up, but just in case, I'll share.

NOTE: The following suggestions are for weaving 11/0 Delicas only.
To change the bead height and width, in BT4, [for 11/0 Delicas], click on 'OPTIONS' in your menue under 'VIEW'. Open the 'Pattern' tab. Scroll down to 'Appearance'. Notice the options of numbers you can use, from the drop down box to the right of 'Bead width' and 'Bead hieight' (in pixels). I have my numbers at 'width (8)' and 'height (10)'. I keep this same, two number spread ratio, for any pattern I create in BT4. You can change the numbers, so more beads will be visible, in your screen graph, by changing these numbers, but I would suggest keeping the ratio of (2) apart, the same. I also set my 'Thread' width at 'zero', but if you want to work with thicker warps, consider changing this too.

If you get a chance, create a perfect circle pattern, in BT4. Weave the same small shape on your loom. Notice if you are getting that 'perfect' circle, or if your tension of weft and warp need to be adjusted, for future pattern creating. I'd love to hear any feed back!

Friday, January 18, 2013

Classes being held at "Bead Soup"
in Savage Mills Maryland

Here is the formal announcement! I'll be teaching 'basic' looming skills at "Bead Soup", in Savage Mills Maryland. This is the cuff we will create together, "The Americana Sampler".


It is a two part class. Part One: Saturday Feb 9th, 11-3:00, Discussing the warp and weft thread options. Learning how to warp your looms and where to begin the first row of beading. I will also have some other tips and tricks to share! You will have homework, as I am looking for others to return to the second class, ready to learn my personal ©Warp Management Method.


Part Two: Saturday Feb 16th, 11-3:00, will be surrounded around taking the cuff off the loom and attaching the clasp. I'll also have time to offer other patterns and ideas for you to complete some cuffs on your own.


Please visit "Bead Soup's" website for details and learn how you can sign up! Hope to meet you there.

Saturday, January 5, 2013

©Tri Warp Bar Loom: continued


As promised, an updated photo, weaving on the loom I built, "©Tri Warp Bar Loom". This is just a small sample of what I am dreaming, this loom is capable of creating. It is always best to start a new idea 'small', so bugs can be worked out and unconsidered methods can be perfected.

I love wide cuffs. Adding further and further width, in a creative new stitch or graphed patterns, can widen a design as far as you want to take it. I usually start with a 'base design', then add as I weave on the loom. My finishing methods allow me the freedom. It may be possible to arrange a similar design technique, on a 'minimal warp manage' type loom, i.e., paper clip style and the like. Maybe with a bit of thought, thick and thin warp threads could be mixed into to those types of looms too. Willing to be more versed, with them, I am sure the means of finishing, for a particular clasp or need, will allow multiple style warps.

Many times, I have written how the standard style loom, with a warp tension control, offers more creative freedom. Sharing this cuff, in stages, offers a way, for me, to point this fact out, in detail. The added delight, for this particular creation, is how my new loom offers the third warp separator bar!

Wednesday, January 2, 2013

©Tri Warp Bar Loom!


I built a new loom....new for me. I searched for anything similar, but wasn't able to find one like it. I call it my ©"Tri Warp Bar Loom".

You see, I have copywritten some techniques using my ©Warp Weight Method. Come to find out, they have been used for hundreds of years, on looms weaving textiles. Not beads. My idea to utilize warp weights, with beads, truly is new and different.

Now I am thinking out side my box again, to actually build a different bead loom. My thoughts are how this method will allow for some various 3D accents to be added to my cuffs. I really haven't scratched the surface, of thinking out all the possibilities. So far, I had to test and rework the loom design and warping means, to the point I am now, shown in the picture above.

You can see, how the warps run in three separate directions. These are the early stages. I'm hoping I have it all worked out in my head, correctly ;D , and this turns out as I am planning. I'll share more pictures later, including further stages of this cuff and it's finish.