Yes, the definition of 'waning' is diminish, decline, decrease, etc. This is the title of one means of warp management. I offer hands on instruction, in class, but hope I can also offer insight as the best direction to follow, out side of one of my classes.
Referred to commonly as “Pull & Pray”. However, with these instructions, there shouldn’t be any reason to Pray”.
SUPPLIES
-BEAD LOOM: There are many style bead looms, on the market. The best looms for this technique would be one that offers either a warp tension controller, so the warp loops can be ‘spun’ off the loom, or a removable peg/pin, allowing the warps to ‘lift’ off the loom. In other words, you will not be able to cut the warps, when removing. I have custom designed the perfect loom, An ©E-Loomette
(available in my Etsy Shop, or contact me regarding availability)
-THREADS: The type, of warp thread used, for this method of weaving, is the most important decision you can make. You’ll need to warp with a ‘non-piercing’ style thread, i.e. ‘Wildfire©’. If the warp is accidently pierced, while weaving the weft, the warp will not wane freely, when removed, from the E-Loomette©. Wildfire© comes in five colors; white, black, blue, red, or green. The green is best, for most bead color ways. Purchase the 10lb or 0.15mm thickness.
HINT: To help eliminate any needle piercing, consider dulling the needle point, on micro sandpaper, or you may turn the needle weaving with the ‘eye’, of the needle, as the point. Also consider a ‘big eye needle’.
-WEFT: I always suggest using a ‘white’ weft. The white will allow the bead colors to POP, as opposed to using any other color. It is not necessary to use the same color, for both warp and weft. As a matter of fact, any type of thread is good to use for the weft. My preference is 14lb Crystral Fireline©. This is not cut in stone. The thread choices are more important than the bead colors, when considering a different finish. But, always WHITE WEFT.
-NEEDLES: I suggest using whatever size is more comfortable. However, since this is a small bead loom, consider a needle length to match the width of your bead weaving. The needle thickness, i.e., #10 THRU #15, will be left for personal preference and size of beads you are weaving. To help with ‘not piercing a warp’, you may want to dull the needle point, on a piece of fine micro sand paper. Then, keep this needle for your Waning Warp weaving. Running the needle ‘eye first’, also will help, from piercing a warp. Big eye needles can be used as well, depending on the type of beads you are weaving. Decide which length or size needle is best for you. Knowing Bead Tapestry Artists, who weave panels 3 feet wide, do not use a 4 foot needle!
-TAPE: The only other supply needed, besides beads and a pattern, will be any type of tape. (I use clear tape.) Tape is what’s used, for securing the warps, to the E-Loomette©. Securing with tape will eliminate the possibility of needing to cut the warps, from the loom. Simply remove the tape and your warps will be free to lift off.
-BEADS: Any loom is capable of weaving any size beads. Also, any style, i.e. Seed Beads or Tubular style beads such as Delicas. My pick is usually to go for the beads with the most color palette offered. This is the case with 11/0 Delicas.
WARPING: …a continuous thread!
KEEP TAUT TENSION, warping back and forth over the loom table, one warp more than the bead width being woven. It is most important to warp very taut, on those looms without a warp tension controller. Otherwise, warp according to the bead loom instruction and tighten the warp tension controller to set the warp tension.
IT IS VERY IMPORTANT you wrap the warp the SAME DIRECTION AROUND THE PEG/PIN/NAILS, EACH WRAP, ON BOTH ENDS. Continue this same “wrap direction”, around the peg/pin/nails, for every warp added, at both ends. A continuous thread, falling in line directly next to each warp, is why you will be able to wane the warps, when lifted from the loom.
STAY IN LINE, ADDING WARPS, LEFT TO RIGHT OR RIGHT TO LEFT, with each dent next in line, across the warp separator. Do not skip a dent, then return to fill, but warp in a collated fashion.
DO NOT CUT THE WARP FROM THE ROLL, AFTER WARPING!
When you have completed adding the necessary number of warps, wrap the warp thread 2-3 times around the end peg/pin/nail. DOUBLE CHECK YOURSELF: If you are warping an even number of warps, the warp end will land on the same end as the starting warp. If you are warping an odd number of warps, these will end at opposite ends of the loom.
In keeping the warp thread, attached to the roll, after waning, and not cutting this thread, you will be able to rewind the unused warp thread, back onto the roll, when completed.
BEGIN WEAVING:
Cut a comfortable length of white weft, not to make it too short or too long, but consider gauging how large of a weave you will be completing. Changing out short wefts simply add to the possibilities of piercing a warp. As you weave this method more, you will become accustomed to a proper length weft, based on the finished size. Look over your pattern and consider weaving the longest row. If you are weaving a square or rectangular shaped piece, then you may start at the top or bottom. If the shape is irregular, start weaving the longest length. This will set the tone, of the bead width, and hold the warps in place, for your decrease, of rows.
DON’T KNOT THE WEFT TO ANY WARP!
Fold the cut weft length in half, using half to weave below the longest line, the other half to weave UP from the longest line. This will eliminate having to add a new weft, when starting ‘center of the pattern’.
Because this method of weaving is not recommended for long cuffs or large bead weaving, adding the first row will be easy, when you are not able to tie a knot.
Knotting may not allow the warps to move, when it is time to ‘pull or wane’ them. Because there is no knot, the first row may seem wonky. Once you add your second row, both rows will be taut and set up nicely.
HINT: As you move the needle, back through the rows, look for the glisten of the needle, between each bead. Also, while your needle is still sitting inside of the row, during your return, move the row up and back to be sure your pass was free of piercing any warps.
DECREASING ROWS:
When decreasing the row,
Opposite Your Needle Hand: Exit the last row woven and then wrap your weft around the first warp. This will keep the weft from following itself out, for the next step. In the picture to the left, I am decreasing two beads. Therefore, go inside two beads, exit.
Continue the weft under the next warp, or third warp in. You are now back UNDER the warp plain. You are ready to load the beads, for this decreased row. In decreasing this manner, you are eliminating any ‘diagonal weft’ which would show between rows, as you weave.
To decrease the row,
Same Side as Your Needle Hand, simply count how many beads, in the pattern, are to be decreased, then bring your needle up inside that same number of columns, from the end warp. In the picture to the right, this is one bead decreased.
When you have completed the pattern, following your graph or word chart, DO NOT KNOT THE WEFT. Let is hang to be managed when the weaving is removed, from the loom. A knot could counter act the free movement of warps, when waning.
Notice in the picture above, minimal weft threads are shown, at each decrease.
REMOVING THE WEAVE FROM THE LOOM:
To remove, simply remove the tape holding the first and last warp, then ‘lift’ the weaving,
from the loom.
If the loom was warped correctly, wrapping around the peg/pin/nail, in the same direction each pass and the warps were collated when placed in the dents, your piece will have continuous loops,
as shown in the photo on the right.
This should also still be tethered to the roll of warp thread.
WANING THE WARPS:
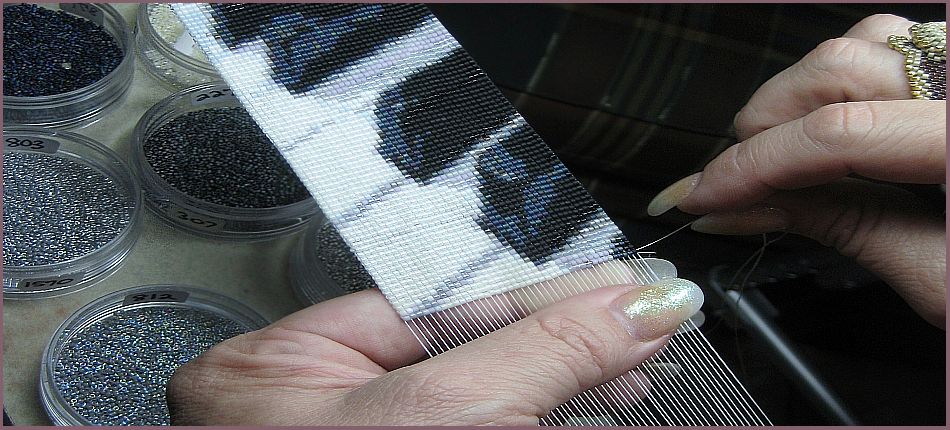
The process will begin, by pulling the warps, in the continuous manner they were placed. Start off by pulling the ‘cut’ warp end first. In doing so, the loop, on the opposite side of the weaving, will begin to shrink. Pull until the loop is very close to the bead weaving edge. Pulling too hard, will force the beading to crinkle.
NOTE: Hold the beading between your fingers, not moving, so you are able to keep track of the next weft in line to pull. Do not set this down or turn.
Now move to the warp, on the opposite side of the weaving, next in line, waning the loop until it shrinks comfortably into place. Continue the UP then DOWN warp pulling, AT THE BASE OF THE NEXT WARP IN LINE, and not moving your hold position. Switching the beading around, may cause you to lose this collated movement.
DO NOT PULL A LOOP!
When all warps have been pulled, you should now have a pool of warp thread, still attached to the bead weaving. Cut this long enough, to allow management back through the weaving. Then simply roll the leftover warp thread, back onto the original roll. (I plan future posts about many options to bury left over warps or wefts. Never, ever run these threads through any beads or bead rows.)
The ultimate situation is that all warps are moving freely. However, if you happened to have pierced a warp and it does not move, consider there will be two more warps, needing to be managed, when you finalize all the pulls. Finalized along with the two left over wefts and two left over warps. To hurdle over this snag, move to the OPPOSITE SIDE of the weaving (if you can’t pull while down, then move to the opposite side, up,) Count three warps in then pull that third warp. You will be back on track to continue waning the rest of the warps.
Depending on the use, for your newly woven beading, manage the left-over warps and wefts, by weaving them back in.
PLEASE CONSIDER THIS FINE POINT: This method of warp management is versed for small pieces, i.e., pendants, earrings, and much more which I offer in many patterns in class. I would not recommend this form of warp management for any long or large weaving, i.e., cuffs, bead portraits, etc. The reason is the pooling of the warp thread, while waning. Knotting occurs and could then cause more of a problem. It is also not recommended for larger weaving because the pulling will force them out of shape.
2019 ©Erin Simonetti. All Rights Reserved.
No part, of this instruction/pattern, may be reproduced, distributed, taught, or loaned, in any manner,
and for any reason, without the expressed written permission, of the author, Erin Simonetti.
The use of this design and instruction is limited to non-commercial purposes only.