

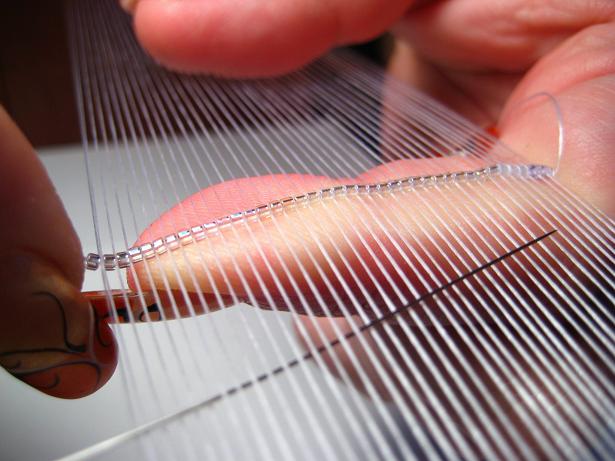
 No matter how wide of a bead looming piece you have designed, the first row can become the most frustrating part of looming seed beads. With other ideas or techniques to cover, let me first offer this insight.
Tie your warp string onto the outside warp, either right or left, depending on which hand is your dominant hand and thread the other end onto a beading needle (sized for the beads being used and the length of what you are looming.) Load the needle with the exact number of beads, for the first row or the widest width of your looming (I'll explain where to begin your looming another time). Push the beads down or let them fall, meeting the knot you just tied. Secure your looming needle for safe keeping while you complete the next step (this could be lightly woven into your warps, softly prick into the sofa arm next to you, or even stick it into the felt lined base of your loom). Using two hands, push up the 'last bead' added near it's proper home, between the last row, opposite the row your knot was originally tied. Pull the weft string taught, as you add bead-per-row. Starting adding the beads to the row where the knot was tied, popping each bead up into place then moving your index finger to hold it there. Keep your index finger pushed 'upward' holding the 'entire row of beads just placed between each row of warps.
Your row should be 'wavey' and 'curling' in opposite directions. No matter how taught you pull the warp, you will still see the same thing. Don't worry, this is normal and you have done everything right!
 In order to make the next row feel more comfortable, I can suggest threading a piece of wire into this first row, which will hold it straight and perfect for the next rows added. Be sure to use a piece of craft wire, which is a comfortable gauge to easily thread inside the seed beads. If you are using 11/0 Delicas, I can suggest using 20 gauge wire, but be sure to test your 'beads vs wire' sizes before you begin to thread this first row with wire. Your row will straighten up and make your future bead loomed rows lay perfect.
The wire can be of any color, because it is not a part of your finished looming.
After you complete another five to ten rows, you will be able to remove this wire and the rows will stay in a straight, uniform row.
This is fascinating - can't wait to follow your journey!
ReplyDeleteThanks Caron! You are such a 'staple' for anyone who wants to pick their friends! I love knowing you...only wish we were closer! I hope to share the cuff for you, right here on this Blog, so you can tell me if you like/dislike anything you see! I'll be sure to let you know when I start it for you!
ReplyDeleteVery interesting ! I never do this technic but the work is very beautiful !
ReplyDeleteIf you are interested, please pick up a loom! It is much faster then hand weaving, and so enjoyable! When you do, please be sure to share!
ReplyDelete